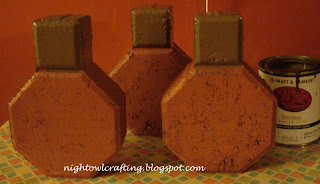
Back in the spring I made ladybug pavers and I thought how fun it would be to make pumpkins for the fall.
So here is the tutorial for my pumpkin pavers.
Supplies
pavers
orange and brown paint
wire, ribbon, fabric, or raffia
paint brush
Step 1~ paint your paver orange. I spray painted mine.
Step 2~ Paint the stem brown. I used paint and a paint brush to do this, because it got dark before I could cover the bottom part and spray paint the stem.
Step 3~ Grab some wire, ribbon, fabric, raffia, or what ever you like to
tie between the stem and the pumpkin.
I used green wire and curled the ends.
Now you have a cute little pumpkin. It is really that easy.
I think they need something more, so if you have any suggestions feel free to leave a comment!
Thanks and have a fabulous weekend!


These are adorable! I love seeing what different things people are making pumpkins out of! Thanks for sharing!
ReplyDeleteHow cool! I love innovative crafts that use unexpected objects. Thanks for sharing these really fun pumpkins.
ReplyDeleteLove, love, love these!!! Great idea! Ooh - bet you could paint pavers as Christmas ball ornaments for the holidays! TFS!
ReplyDeletePure genius, Leslie! I love it!
ReplyDeleteSO STINKING CUTE! Seriously genius!
ReplyDeleteYou should link this up to my Making It With Allie Party!
Allie
AlllieMakes.Blogspot.com
I've thought about doing this too...it looks great!! time to get some pavers :)
ReplyDeleteVery cute idea. Thanks for sharing.
ReplyDeleteSo cute! I definitely neeeeeeeed to make these! It isn't a want, it is a NEED! Ha ha! I don't think they need anything more. In your first picture you have them situated with some branches and I think that looks fabulous. Another thing you might like is to get some hay and maybe situate them on some hay on a mantel. Otherwise the branches are fab!
ReplyDeleteThat is such a cute idea!
ReplyDeleteThis comment has been removed by the author.
ReplyDeleteI was thinking maybe if there were lines somehow down the pumpkin...I dunno. I do know that these are awesome and you are definitely some kind of a genius! :) Thanks for sharing!
ReplyDeleteOh, also, I have a question. Did you attach the pavers in any way? How does the stem stay on? Or is it just sitting up there? Thanks!
pam{dot}helm{at}hotmail{dot}com
Stinking Cute!!
ReplyDeleteThese are so cute! Love them.
ReplyDeleteYou are so creative! This is such a great idea! Totally unique and cute! I am featuring this at somedaycrafts.blogspot.com
ReplyDeleteSuch a great idea! I'm definitely doing this as I need stuff that can stand up to the weather in order to decorate my porch! Thank you!!!
ReplyDeleteOh wow, that is WAY to cute. Lasts forever, weather proof, and so darn awesome. Came to check you out, and what do I find, such an awesome tutorial. I would LOVE to have you join me at **6 weeks 2 Spook** all thing Halloween. These would be perfect, and I would be thrilled to have you over. I am joining your party tomorrow, and love it, so thank you for all the great parties, ideas, and wonderful blog. You really are a Hoot. :) Bella :) ps. is being a Hoot good, just making sure, cuz, you are GREAT!!!!
ReplyDeleteI’ve given you a blogger award! I love your blog.
ReplyDeleteKallie @
www.holmmade2010.blogspot.com
What a brilliant idea! Thanks for sharing!
ReplyDeleteI just wanted to stop by and let you know that I linked to this post today from the Home & Garden channel at Craft Gossip. :)
ReplyDeleteYour feature will appear in the main Craft Gossip RSS feed, on the main home page and can be found directly here
http://homeandgarden.craftgossip.com/6-creative-pumpkin-ideas/
If you would like a "featured by" button, you can grab one here!
http://homeandgarden.craftgossip.com/grab-a-craft-gossip-button/
I bought one at a craft show last year that has a turkey face painted on it. There is a long strip painted black that is glued where the tip meets the block, the tip is also painted black. Makes a real cute turkey with a pilgrim hat. Hope this maked sense. The strip is the brim for the hat.
ReplyDeleteWhat kind of paint any kind in particular that I should use??
ReplyDeleteWhat kind of paint in particular any specific kind I should use?
ReplyDelete